Active Campaign integration
SmartBot360 makes it easy to have bots create Active Campaign contacts. Here are the steps.
Prequisites
The integration only works with the Active Campaign plans below:

Step 1
Login to your ActiveCampaign account. Go to Settings, then to the “Developer” tab. There you can find your API Key and API URL. Copy them.
Then, login to the SmartBot360 Management Dashboard, go to the SETTINGS page, and under Integrations select ActiveCampaign. Fill the API Key and API URL collected above, as shown below.
Step 2
Go to CHATBOTS to create a Flow Diagram bot. The bot should first collect some information about the end user (email is necessary to create an ActiveCampaign contact) and then create the ActiveCampaign contact, as shown below.

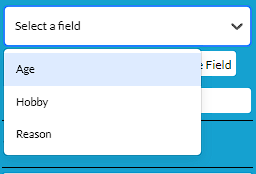
Use the dropdown menu to select the custom field that you want to add to the Active Campaign contact.

Type in the text input field with the value you want to set the custom field to be. You can also use a user variable as a value for a field. Examples shown below:

OPTIONAL STEP - Store CUSTOM contact fields
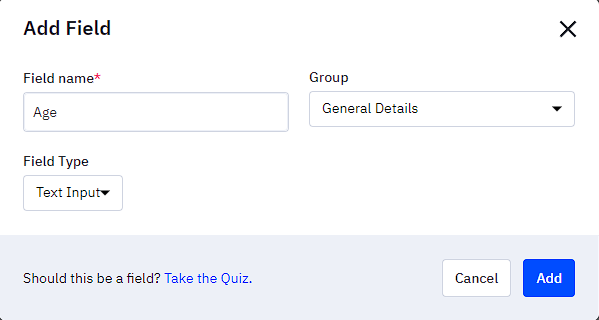
Navigate to the Settings page, then to Manage Fields within the Active Campaign website. Then click on the Contacts tab.

Click the blue ‘Add Field’ button located near the top right of the page.

Type the desired custom field’s name in the ‘Field name’ section of the modal. Set the field type to ‘Text input.’ Then click the blue ‘Add’ button to finish creating the custom field.
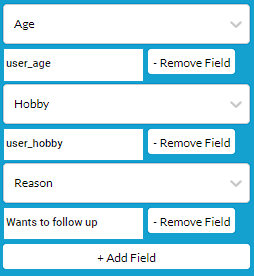
Go to your bot diagram in SmartBot360. To add the custom field(s) to your Active Campaign contact, click on the ‘+ Add Field’ button

Use the dropdown menu to select the custom field that you want to add to the Active Campaign contact.
Type in the text input field with the value you want to set the custom field to be. You can also use a user variable (e.g. ‘user_age’) as a value for a field. Examples shown below: